js
開始學習 React js
最近開始來學react,相關的文章不會寫得非常細,主要是要寫學習過程。
參考文章:http://tylermcginnis.com/reactjs-tutorial-a-comprehensive-guide-to-building-apps-with-react/
關於參考文章
我參考的文章還挺多的,但每篇都花時間寫很細有點難,所以這篇是參考http://tylermcginnis.com/reactjs-tutorial-a-comprehensive-guide-to-building-apps-with-react/去實作的過程,有興趣的可以參考該網站即可。
React 專有名詞
這blog將常用名詞放在第一篇,我認為很棒,這樣有助於了解整個框架。
- JSX – react將html 元件直接寫在js內,透過jsx可以在js內寫類似html 格式的程式碼,再轉換成純js。
- Virtual DOM - 透過js產生出真實的DOM。
- React.createClass – 這個方法用來產生html 元件。
- render (method) – 繪製html元件。
- React.render – 將元件繪製到html dom上。
- state – 元件的內部儲存資料。
- getInitialState – 設置元件的初始狀態。
- setState – 改變元件的狀態。
- props – 從父層的元件取得值並傳送到子元件。
- propTypes – 驗證父層的值。
- getDefaultProps – 設定預設的值。
- Component LifeCycle - 元件生命週期
- componentWillMount – Fired before the component will mount
- componentDidMount – Fired after the component mounted
- componentWillReceiveProps – Fired whenever there is a change to props
- componentWillUnmount – Fired before the component will unmount
- Events
- onClick
- onSubmit
- onChange
學習 React.js
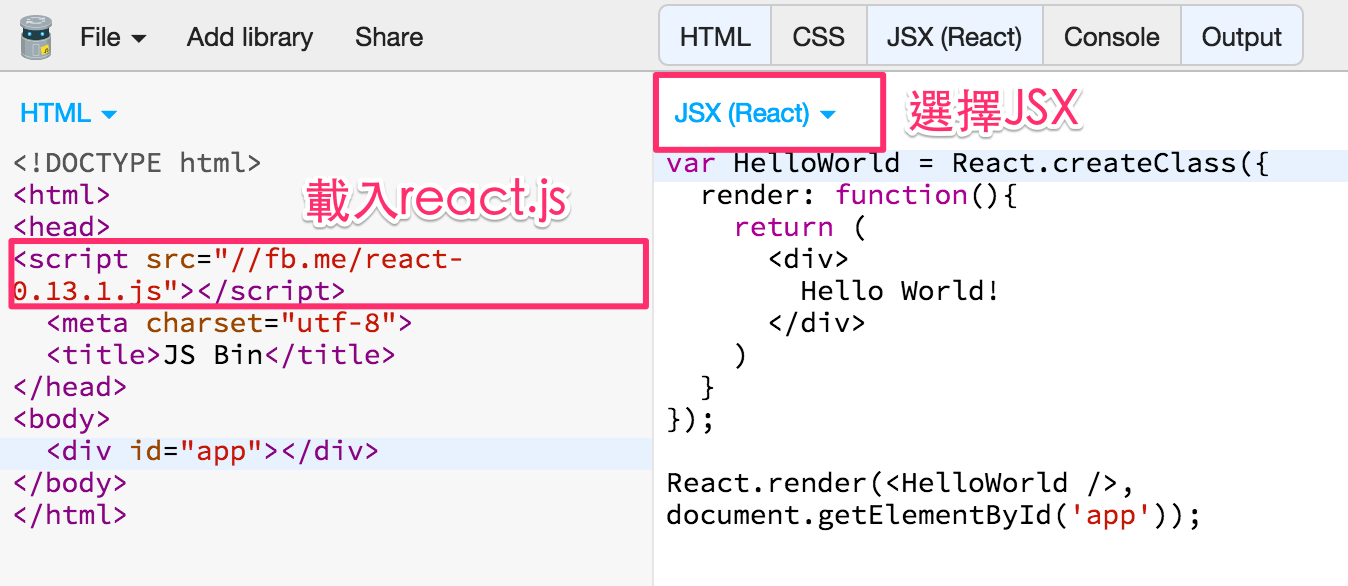
環境
在環境上可以使用jsbin,有些小地方稍微調整一下就可以簡單上手(如下圖)。
接下來隨意用個demo,選擇run with js,就可以看看有沒有成功了。
建構第一個元件
第一個元件主要介紹如何透過JSX來繪製。
var TheFirst = React.createClass({ // 建立新的元件
  render: function(){ //畫出你想要的元件架構
    return( // 元件開始
      <div>
        The First
      </div>
    ) // 元件結束
  }
});
React.render(<TheFirst />, // 輸入剛剛宣告的元件名稱
  document.getElementById('app') // 目標DOM
);點擊run with js 預覽
加一點狀態在元件上
var TheFirst = React.createClass({ // 建立新的元件
  getInitialState: function(){ // 定義預設狀態
    return { // 回傳json格式狀態
      userstate: '單腳站容易歪'
    }
  },
  render: function(){ // 畫出你想要的元件架構
    return( // 直接用{}帶入值
      <div>
        The First {this.state.userstate}
      </div>
    ) // 元件結束
  }
});
React.render(<TheFirst />, // 輸入剛剛宣告的元件名稱
  document.getElementById('app') // 目標DOM
);事件控制
var TheFirst = React.createClass({ // 建立新的元件
  getInitialState: function(){ // 定義預設狀態
    return { // 回傳json格式狀態
      userstate: '單腳站容易歪'
    }
  },
  handleChangeA: function(e){ //自訂事件名稱
    this.setState({ // 設定狀態
      userstate: e.target.value
    });
  },
  render: function(){ // 畫出你想要的元件架構
    return( // 透過onChange觸發handleChangeA事件
      <div>
        The First {this.state.userstate} <br />
        change state :
        <input type="text" value={this.state.userstate} onChange={this.handleChangeA} />
      </div>
    ) // 元件結束
  }
});
React.render(<TheFirst />, // 輸入剛剛宣告的元件名稱
  document.getElementById('app') // 目標DOM
);從父層抓取資料傳回值
var HelloUser = React.createClass({
  render: function(){
    return ( // 透過this.props 抓取父層屬性
      <div> 必殺, {this.props.skill}!</div>
    )
  }
});

React.render(<HelloUser skill="魔貫光殺砲"/>, // 父層屬性
document.getElementById('app'));巢狀元件
這邊有個陷阱,沒注意到卡超久,當載入另一個元件時,必須在用一個標籤包起載入的元件。
var SkillList = React.createClass({
  render: function(){
    // 透過 this.props 讀取父層得值
    var listItems = this.props.skills.map(function(item){
      console.log({item});
      return <li>{item}</li>;
    });
    return (
      <div>
        <h2>技能列表</h2>
        <ul>
          {listItems}
        </ul>
      </div>
    )
  }
});

var HelloDragonBall = React.createClass({
  getInitialState: function(){
    return {
      skill: "魔貫光殺砲",
      allskills: ['龜派氣功', '元氣彈', '太陽拳'] //要給內層用的陣列
    }
  },
  render: function(){
    return (
      // 注意,這種做法外層必須有標籤
      <div>
        <h1>必殺, {this.state.skill}!</h1>
        <SkillList skills={this.state.allskills} />
      </div>
    )
  }
});

React.render(<HelloDragonBall />,
document.getElementById('app'));經典模組,新增清單
var AddSkill = React.createClass({
  // 這元件包含了input、button,用來增加新的技能
  getInitialState: function(){
    return {
      newSkill: ''
    }
  },
  updateNewSkill: function(e){
    //每次輸入更新值
    this.setState({
      newSkill: e.target.value
    })
  },
  handleAddNew: function(){
    // 按下button時,將資料更新到父層
    this.props.addNew(this.state.newSkill);
    this.setState({
      newSkill: ''
    })
  },
  render: function(){
    return(
      <div>
        <input type="text" value={this.state.newSkill} onChange={this.updateNewSkill} />
        <button onClick={this.handleAddNew}>Add new Skill</button>
      </div>
    )
  }
});

var SkillList = React.createClass({
  render: function(){
    // 透過 this.props 讀取父層得值
    var listItems = this.props.skills.map(function(item){
      console.log({item});
      return <li>{item}</li>;
    });
    return (
      <div>
        <h2>技能列表</h2>
        <ul>
          {listItems}
        </ul>
      </div>
    )
  }
});

var HelloDragonBall = React.createClass({
  getInitialState: function(){
    return {
      skill: "魔貫光殺砲",
      allskills: ['龜派氣功', '元氣彈', '太陽拳'] //要給內層用的陣列
    }
  },
  addNewSkill: function(newSkill){
    console.log(newSkill);
    // 更新allskills資料
    this.state.allskills.push(newSkill);
    this.setState({
      allskills: this.state.allskills
    })
  },
  render: function(){
    return (
      // 模組子層addNew更新時,觸發addNewSkill
      <div>
        <h1>必殺, {this.state.skill}!</h1>
        <AddSkill addNew={this.addNewSkill} />
        <SkillList skills={this.state.allskills} />
      </div>
    )
  }
});

React.render(<HelloDragonBall />,
document.getElementById('app'));累了,React的tag有沒有什麼工具…,純手打好累。